
Anyway I got back from holiday a couple days ago and I've sort of been stuck for things to do, so yesterday I was scrolling through Pinterest, as I have been doing a lot recently and I came across this amazing looking piece of art called "String Art" I looked at the website and it was under a list of "18 DIY projects to decorate your dorm room" it had this picture but didn't tell you how to do it. I looked string art up on YouTube and loads of things came up, so I decided to give it a go my self.
What you will need:
Wood
Naills/Tacs
Hammer
Coloured thread
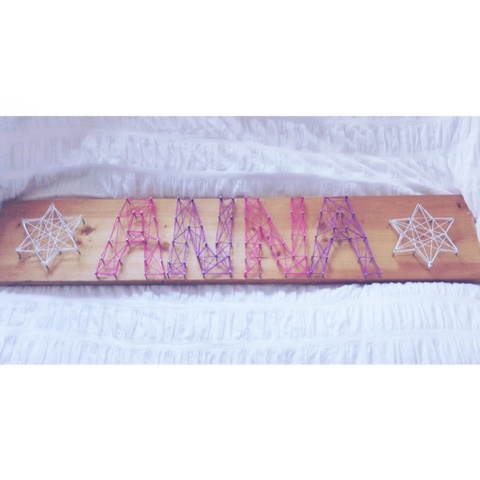
The first thing your going to want to do is come up with a design and then make sure you have enough nails for the design you want to do. I decided to do my name with stars on either side.
Next prep your wood and clean it (mine wasn't in the best condition) I sand papered it then put linseed oil all over it, to make it a nice texture and colour. Next draw your design onto the wood using a pencil. I used a cookie cutter for my stars. 
Now when hammering the nails into the wood you need to make sure they are straight and also that you leave quite a bit of the nail sticking out of the wood.

Next take a floured thread of your choice I used white, pink and purple, then knot it round one of the pins and intertwined it through the nails. Remember to wrap the thread fully around one nail before going on the next! 
 And there's the finished product, if I had to do something differently I would have painted the wood white first as my name would have stood out more, (I would have done the stars a different colour) however I am really happy with the outcome! If you try this out please let me know how it went and what design you went for! Thankyou for reading.
These stars are my favourite bit because the white stands out a lot against the wooden background.
And there's the finished product, if I had to do something differently I would have painted the wood white first as my name would have stood out more, (I would have done the stars a different colour) however I am really happy with the outcome! If you try this out please let me know how it went and what design you went for! Thankyou for reading.Until next time
-Anna
No comments:
Post a Comment